Nowhere is more important than your own home – this is why having optimum thermal insulation at home is so important. But the requirements in terms of the type and thickness of the insulation material are very different depending on where it is being installed. So it’s even better when you can rely on a material that has flexible and versatile uses: flapor. It simply stops the cold getting in.
The flapor thermal insulation board EPS-W20 – developed for thermal insulation with loading – provides optimum insulation between floors and the ground where there are temperatures of just 8 to 12°C all year round. Appropriately thick flapor thermal insulation therefore makes a home cozy and warm from the ground up.
Pssssssssssssssssst…
flapor is not just outstandingly suited to preventing heat loss, but also noise: Integrated in the floor structure of the intermediate floors, flapor footfall sound insulation boards absorb every step. They are also elastic, highly resilient and can be laid easily and quickly in floating screed.
The footfall sound insulation.
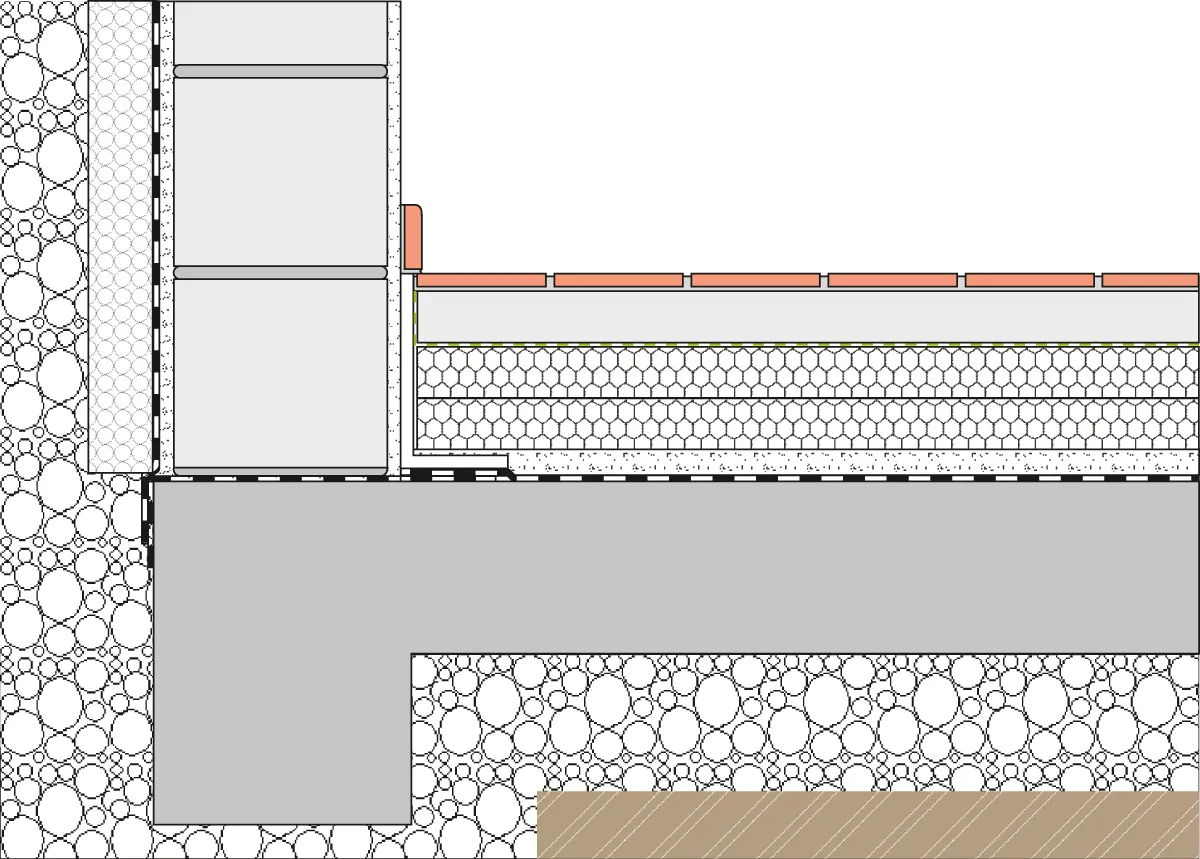
flapor footfall sound insulation boards EPS-T
PE-Folie
height compensation (grit, sand)
angle edge strips
screed
The key requirement for the footfall sound insulation to work perfectly is to avoid any acoustic bridges between the screed and adjacent brickwork.
The advantages of footfall sound insulation boards.
Low levels of compression
Suitable for all levels of traffic in residential buildings
Proven to work in building construction for decades
Moisture-resistant
Easy to lay
Outstanding value for money
Processing recommendation for screed
Source: GPH
Prepare ceiling surface The bare ceiling must be thoroughly cleaned before starting the footfall sound insulation works. Any protruding concrete parts or reinforcement bars or lumps of mortar must be removed. If necessary, a bed of sand or flaporplus EPS-W20 may also be applied as a leveling layer. This will allow you to lay installation cables between or in flaporplus EPS-W20 boards. If moisture is expected to penetrate down through the insulation boards, waterproofing or a PE foam film should be applied to the ceiling.
Lay edge strips Provide PE edge strips all the way round the wall (prevent acoustic bridges).
Lay insulation boards Starting in a corner, lay out the boards loosely in rows. Bump up to flapor EPS-T footfall sound insulation to prevent any acoustic bridges. Lay in combination with offset butt joints, although you should start by alternating between full and half boards.
Lay separating layer Cover the insulation boards which have been laid with a separating layer. The paths of the separating layers must overlap each other by at least 10cm and be pulled up on all wall sides to the top edge of the PE edge strips.
Apply screed Apply screed in accordance with the manufacturer’s instructions.
Hängt von den Anforderungen ab: Isolierend mit Transportschutz, Mehrweg mit einfachem Handling, hoher Transportschutz und doch leicht und natürlich auch die Optik. Geht alles, fragen Sie uns einfach.
Manage Consent
To provide the best experiences, we use technologies like cookies to store and/or access device information. Consenting to these technologies will allow us to process data such as browsing behavior or unique IDs on this site. Not consenting or withdrawing consent, may adversely affect certain features and functions.
Functional
Always active
The technical storage or access is strictly necessary for the legitimate purpose of enabling the use of a specific service explicitly requested by the subscriber or user, or for the sole purpose of carrying out the transmission of a communication over an electronic communications network.
Preferences
The technical storage or access is necessary for the legitimate purpose of storing preferences that are not requested by the subscriber or user.
Statistics
Die technische Speicherung oder der Zugriff, der ausschließlich zu statistischen Zwecken erfolgt.The technical storage or access that is used exclusively for anonymous statistical purposes. Without a subpoena, voluntary compliance on the part of your Internet Service Provider, or additional records from a third party, information stored or retrieved for this purpose alone cannot usually be used to identify you.
Marketing
The technical storage or access is required to create user profiles to send advertising, or to track the user on a website or across several websites for similar marketing purposes.